Web-Based Emergency Notification System Interface
This sample builds a simple, web-based emergency notification system using Voicent Java Simple Interface. For other programming languages, the steps are similar. Source code of this sample is included, and you are free to use, redistribute, or modify the system any way you prefer.
1. Using the Emergency Notification System
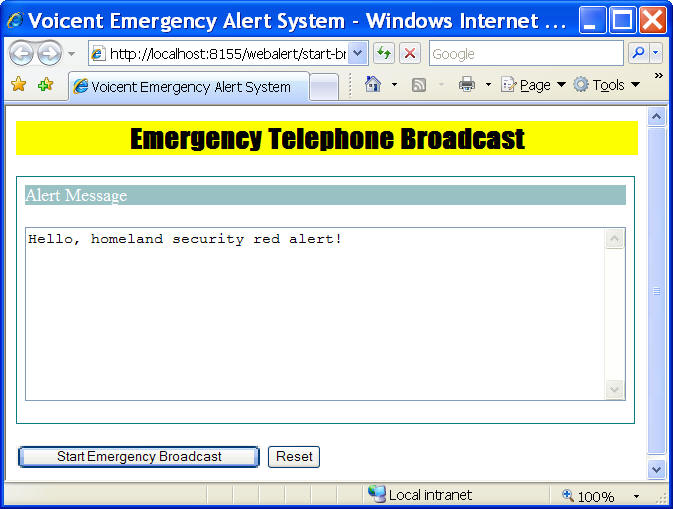
The main interface of this emergency notification system is a web page. If you deploy the system on Voicent Gateway, you can access it from the following URL (put your computer name or IP address accordingly):
http://<COMPUTER_NAME_OR_IP_ADDRESS>:8155/webalert/start-broadcast.htm
If you access it from the same computer the gateway is running, you can use:
http://localhost:8155/webalert/start-broadcast.htm
Usage Description
To start an emergency alert, enter the emergency notification message in the Alert Message Box, then click the Start Emergency Broadcast button.
The system will start calling each phone number on the emergency call list. When the call is answered, either by a live human or an answering machine/voicemail, the system will play the alert message over the phone. The alert message text is automatically converted to voice using our text-to-speech engine. The default text-to-speech engine included in Voicent Gateway is a free one from Microsoft. The voice is robotic and hard to understand. For real usage, it is strongly recommended that you get the Voicent Text-to-Speech engine.
The following is the status page of the current emergency broadcast.
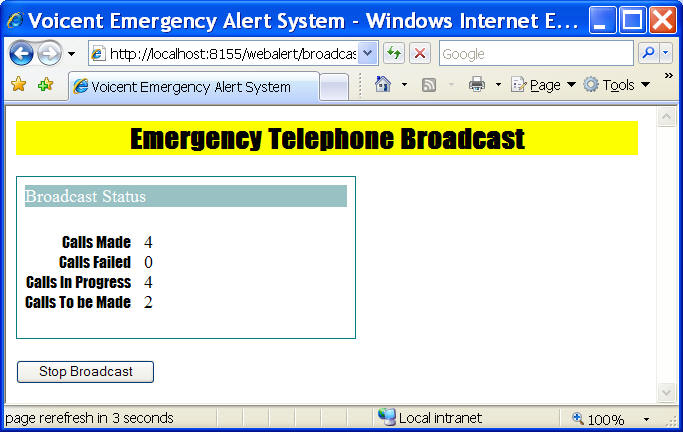
This page shows the current call status. For every 10 seconds, it will refresh the page and display the latest status. You could also stop the broadcast by clicking the Stop Broadcast button.
2. Install the System
First, download the package and unzip it to a folder.
You should be able to deploy the software on any web server that supports JSP. Here we show the steps to deploy it on Voicent's Gateway.
Voicent's Gateway contains a web server that supports JSP (TOMCAT from Apache.org). The configuration file is also included.
This configuration file simplifies the installation of this application to Voicent Gateway. To install, unzip the webalert.zip file to a folder. Then click on Voicent Gateway icon, choose Application from the main menu, then choose Setup Application...
Click the Install button, click the Browse button. Choose the unzip folder for webalert. select conf folder, then select the file named webalert.conf. Click OK. You should see the following:
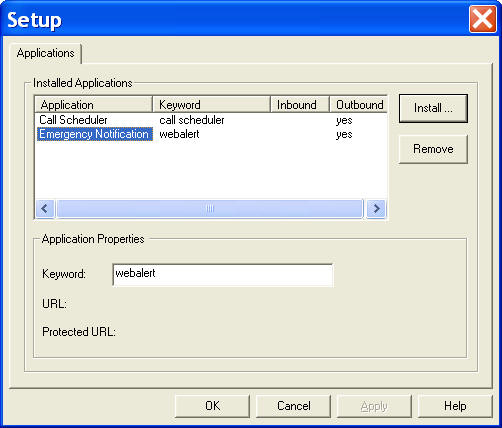
The webalert application is installed. (You can see that the Call Scheduler is actually a regular Gateway application). If you right mouse click on the gateway icon, you can see the context menu will include "Emergency Notification...". The same context menu item is also installed under the gateway main menu under Application.
Enter your Call List
Enter names and phone numbers to the file named myCallList.txt under the gateway folder. The folder is at: C:\Program Files\Voicent\Gateway.
The format is a comma separated file, with each person listed in a separate line. The following is an example:
John Smith, 123-1111
Jane Smith, 333-3344
If you just want to use the system as is, you can skip the rest of this tutorial.
3. Main Java Classes
The following are the main Java classes for this application.
| BroadcastManager | Main interface class. |
| BroadcastThread | Background thread for managing calls. |
| BroadcastList | Interface for call list. |
| BroadcastListFile | Interface for call list, implemented as a file. |
| Voicent | Voicent Gateway simple call interface. |
Example
It is straightforward to use BroadcastManager. Here is a simple test loop:
                        // get a manager instance
                        BroadcastManager manager = BroadcastManager.getInstance();

                        // this will start the BroadcastThread in the background
                        manager.startBroadcast("Red Alert! Red Alert!");

                        do {
                        // poll Voicent Gateway
                        Thread.currentThread().sleep(20000);

                        System.out.println("Calls Made: " +
                        Integer.toString(manager.getCallsMade()));
                        System.out.println("Calls Failed : " +
                        Integer.toString(manager.getCallsFailed()));
                        System.out.println("Calls Inprogress : " +
                        Integer.toString(manager.getCallsInprogress()));
                        System.out.println("Calls To be Made : " +
                        Integer.toString(manager.getCallsToBeMade()));

                        }
                        while (manager.getCallsInprogress() > 0);
The main program starts the broadcast by calling startBroadcast with the alert notes. The BroadcastManager in turn starts the BroadcastThread, which is the main loop for submitting calls to Voicent Gateway and getting call status. The thread main loop is the run method.
                        // keep loop until stopped or there are current calls
                        while (isOngoing_ || curReqIds_.size() > 0) {
                        // any room for more call
                        while (isOngoing_ && curReqIds_.size() < lines_) {
                        if (! list_.next()) { // end of call list
                        isOngoing_ = false;
                        break;
                        }
                        // submit call request to gateway
                        String phoneno = list_.getValue(BroadcastList.PHONE);
                        String reqId = voicent_.callText(phoneno, notes_, false);
                        curReqIds_.add(reqId);

                        // message will be included in the gateway output.log
                        System.out.println("<<<<<<<<<< " + phoneno + " : " + reqId);
                        }

                        // check status
                        boolean hasFinishedCall = false;
                        int index = 0;
                        while (index < curReqIds_.size()) {
                        String reqId = (String) curReqIds_.get(index);
                        String status = voicent_.callStatus(reqId);
                        if (status.length() == 0) {
                        index++;
                        continue; // not finished yet
                        }

                        System.out.println(">>>>>>>>>> " + status + " : " + reqId);
                        if ("Call Made".equals(status))
                        callsMade_++;
                        else
                        callsFailed_++;
                        hasFinishedCall = true;

                        curReqIds_.remove(index);
                        voicent_.callRemove(reqId);
                        }

                        // Voicent Gateway is like a web server, you have to
                        // poll in order to get status
                        // if no finished calls, wait 10 seconds before continue
                        if (! hasFinishedCall) {
                        try {
                        Thread.currentThread().sleep(10000);
                        }
                        catch (InterruptedException e) {
                        }
                        }
The variable isOngoing_ indicates whether the current broadcast is still ongoing or not. It will be set to false when stopBroadcast is called, or the end of the call list is reached.
The first section submits calls to the gateway and tries to maintain the number of calls to be the same as the number of phone lines. Actually, the number of calls submitted does not have to be equal to the number of phone lines. Any extra calls submitted will be queued by the gateway scheduler. voicent_ is the object representing the simple call interface, and callText is the method for submitting call request to the gateway.
The next section checks the call status from the gateway. It calls callStatus to get the call status. If the call is made or failed, it calls callRemove to remove the call record on the gateway.
Please note that if the call status is empty, you should not remove the call record. The call might not be scheduled, or it might be ongoing. Deleting the call record while the call is still ongoing might cause audio cutoff or even system crash.
The last section simply wait for 10 seconds if all calls are still ongoing.
4. User Interface HTML and JSP Files
The following are the user interface files.
| star-broadcast.html | HTML file containing the broadcast form. |
| startHandler.jsp | JSP file to handle startBroadcast. |
| stop-broadcast.jsp | JSP file to handle stopBroadcast. |
| broadcast-status.jsp | JSP file to handle broadcast status. |
start-broadcast.htm is the file that shows the broadcast form. Once a user clicks the Start Broadcast button, the form is submitted to startHandler.jsp.
// get the alert notes
                String notes = request.getParameter("notes");

                // start broadcast thread
                BroadcastManager manager = BroadcastManager.getInstance();
                if (manager.startBroadcast(notes)) {
                response.sendRedirect("broadcast-status.jsp");
                return;
                }
Once the broadcast thread is started in the background, the page is forwarded to broadcast-status.jsp. This page simply displays the current statistics of the broadcast every 10 seconds. The following javascript refreshes the page.
<script>
                    var tleft=10;
                    function beginrefresh() {
                        if (! document.images)
                            return
                        if (tleft == 1)
                            window.location.reload()
                        else {
                            tleft--
                            window.status="page rerefresh in "+tleft+" seconds"
                            setTimeout("beginrefresh()", 1000)
                        }
                    }
                    window.onload=beginrefresh
                        </script>
5. Call List
The Java interface BroadcastList defines the methods for a call list. In the simple sample, we implemented BroadcastListFile to manage the actual call list. As the name indicates, it is based on a text file using the following format.
| name, phone, [other value,...] |
| name, phone, [other value,...] |
In this sample, only the phone number is used.
To simplify the sample, we have hard coded the file name in the start-broadcast.htm file. The following hidden field is included in the file:
<input type=hidden name=calllist value="myCallList.txt">
This parameter is submitted to startHandler.jsp. This file should be saved in webalert home directory. If you want to change the location, you can specify an absolute path in the value.
Another popular implementation for call list is to use a relational database, such as MySQL. We do not implement this class. It should be straightforward to implement this class.
6. Increase the Call Capacity
Call capacity can be increased by using more Voicent Gateways to make phone calls. It is easy to change the program to accommodate this. Since the gateways are distributed, you can add as many gateways as you wish - there is virtually no limit to build more call capacity.
Their are two different ways to add support for additional gateways, 1 in the constructor of BroadcastThread:
                        public BroadcastThread()
                        {
                        // We use only one gateway in this sample, but you can create
                        // multiple Voicent object for multiple gateways
                        voicent_ = new Voicent();

                        // set the number of phone lines available
                        // this number can be fetched from Voicent Gateway
                        // it is hard coded in this sample.
                        // it is fine if the number does not match the actual phone lines
                        // since the gateway call scheduler can decide which calls to make
                        lines_ = 4;
                        }
Create a Voicent object for each gateway instance, and increase the lines_ for the additional call capacity; or 2 create a BroadcastThread object for each gateway instance.
7. Source Code
The following download contains both the source code and compiled code.
Download Source Code