
Share This Post:
Forwarding Ports
When setting up Voicent software, you may experience a lack of audio or response from your SIP/VOIP service. This is often caused by your router blocking traffic to your Voicent software, effectively stopping our software from communicating with the services necessary to make calls. In order to fix this, you’ll need to make sure you’re forwarding a few ports on your router. Forwarding ports is easy, and can be done in just two easy steps:
- Assign Your Computer a Static IP
- Forward Ports On Router
This article will briefly discuss each step. For a more in depth description of how to forward ports, take a look at this helpful article from PC World on how to forward ports.
How to Assign a Static IP
To assign your computer a static IP address, you first need to get little information about your network. To do so, open the command line (click start and type “cmd” in the search bar) and type ipconfig /all and then press enter. This will produce a list of information. You’ll need to write down the following information:
- IPv4 Address (or IP Address)
- Subnet Mask
- Default Gateway
- DNS Servers
After collecting the information above, you’ll need to open your Control Panel. Once inside the Control Panel, open the Network Settings. There should be an option to Manage Network Connections.
Select the Local Area Network option in the menu, and then click Properties. In this menu, there’s an option labeled Internet Protocol Version 4. Select this option, and then click Properties. The menu should look something like this:
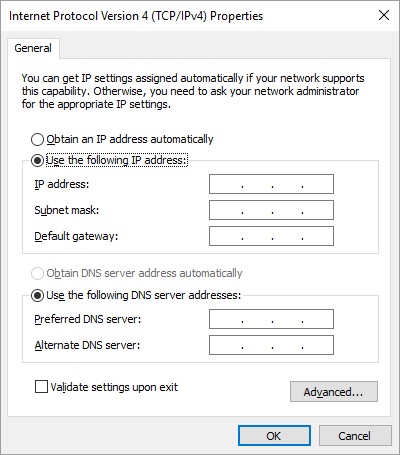
In this menu, select the option to use the following IP address. Add 10 to the last digit of your default gateway (i.e. if your Default Gateway is 192.168.1.1, the new number is 192.168.1.11.) and enter it into the form. Now copy the information you received earlier from your command line, and you’ll have a static IP address.
How to Forward Ports
Now that you have a static IP, we’ll need to forward some ports. To do so, login to your router by typing your default gateway into your web browser. Make sure not to google search the address, instead type it into the address bar where you see a URL like http://www.example.com/.
The login information of your router is either the default, which is in the router documentation (or printed on a sticker on the router), or it is changed by your network manager. Once you’ve logged into your router, look for an area labeled “Applications & Gaming,” “Advanced,” “Port Forwarding/Port Triggering,” “NAT/QoS,” or something similar.
Here you will enter the static IP address you’ve assigned, and specify the protocols and ports. You can use TCP, UDP, or both. The port numbers you will be forwarding are as follows:
- Gateway: 8155, 8165 TCP
- SIP: 5060 TCP/UDP
- SIP Audio: 9156 UDP
- Gateway Remote Agent: 8455 TCP
- Gateway Remote Agent Audio: 8455 UDP
Here is a diagram of the ports necessary to configure: firewall ports diagram.
For users with multiple lines, you’ll need to open additional ports for each line. The second line will use the ports 5061, 9158, and 8456. For each additional line, add one to the port numbers listed above, except for SIP audio which goes by two (as seen in previous example). After forwarding these ports, your Voicent App will be able to successfully communicate with your SIP service and remote agents.
Share This Post: