Share This Post:
How to develop an IVR Application (Part I)
In this article, we describe general steps to create an IVR application using the following example.
I would like the following steps to occur:
The first message the caller hears is “Thank you for calling TellTaleDriver.com. To report a driver press #1 on the your telephone key pad. To speak with TellTaleDriver directly, press Zero”. (So the first 2 options are 1 and Zero.)
If they press #1, the message is: “To make a driver report, please enter the 4 digit numpber that appeared on the “How’s My Driving?” decal on the car”.
When they enter 4 digits, it directs them to the account holders voice mail box to leave the message of the driving report. The message is then emailed to the email address entered in that voicemail account.
There are an initial 21 boxes I’d like to set up: with the 4 digit #’s ranging from: 0001 (my SAMPLE account) and 1001 -1020 (20 boxes) (I don’t have email addresses to enter in these 20 accounts yet. As the service is purchased I will enter them)
To developer an IVR application described above, you normally need three components:
1. Data Manager. A data manager component is usually a relational database, a software program, or just a data storage place using folders and files. In this example, this is the component to store voicemail audio files. This component also provides interfaces other than the phone interface, such as a Browser based application to access voicemails online.
2. Call Manager. A call manager component is the call flow you designed and deployed using IVR Studio. This component manages the incoming calls.
3. Interface between call manager and data manager. These are the extensions programs or scripts to link the two components. This components are the collection of IVR Studio actions.
Data Manager for Voicemails
In this example, we use Windows’ folders and files as the storage for voicemail files. Make a new folder such as C:\voicemails, and then make sub-folders for each voicemail box. To simplify management, use the account number for the folder name.
If you use a relational datbase, such as mySQL databse, for the data storage, you need to develop similar storage structures. You could also develop Browser based application to access the voicemails. But these topics are outside the scope of this artile.
Develop Call Flow
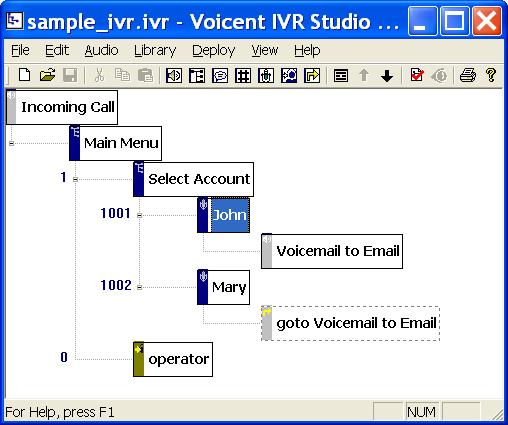
1. Open IVR Studio, click File &ft; New. Right click on the “Incoming Call” element, from the popup menu, select Add next Element > Choice…. From the General tab, enter a name like “main menu”, click Finish.
2. Add the prompt of each element/node. Right mouse select the element labeled “main menu”, select Properties…, then click the Prompt tab. Click the New button, from the Edit Prompt window, enter the text: “Thank you for calling TellTaleDriver.com. To report a driver press #1 on the your telephone key pad. To speak with TellTaleDriver directly, press Zero”. You could also use a pre-recorded audio file for the prompt.
3. Right Click the “main menu” element, from the popup menu, select Add next Element > Choice…. From the General tab, enter a name like “Select Account”, and enter 1 to the box labeled touch tone response is. Click Next, the enter the prompt as described in step 2. Use the text “To make a driver report, please enter the 4 digit numpber that appeared on the “How’s My Driving?” decal on the car”, or a pre-recorded audio file. Click Finish
4. Right Click the “main menu” element, from the popup menu, select Add next Element > Call Transfer…. From the General tab, enter a name like “Operator”, and enter 0 to the box labeled touch tone response is. Enter appropriate prompt.
5. Add new account number. Right click the element labeled “Select Account”, from the popup menu, select Add new element… > Recording…. From the General tab, enter a name like “John”, and enter 1001 to the box labeled touch tone response is. Enter appropriate prompt.
6. Set voice mail to email. Right click the element labeled “John”, from the popup menu, select Add new element… > Prompt. From the General tab, enter a name like “Voicemail to email”. Enter appropriate prompt.
7. Add another account, such as “Mary” with account “1002″, using steps shown in step 5.
8. Right click the “Mary” element, from the popup menu, select Add new element… > Go to. Select “Voicemail to Email” from the Jump to element drop down box.
9. Save the call flow by select File > Save. The finished Call flow is shown below.
10. Repeat steps 8 and 9 to add more extension.
Continue to Part II…
Share This Post:

