
Share This Post:
How to develop an IVR Application (Part II)
Continued from Part I…
Interface between call manager and data manager
The Call flow developed above handles the incoming calls, such as play the desired prompt, collect touch tone keys entered, record the custom voicemail, and direct the call using the designed call flow. However, it does not link the call flow to the data storage. For example, the saved voicemail is not saved to the correct folder, and no email notification will be sent.
The interface are implemented using IVR Studio Actions.
1. Declare variables for email address, folder name, and voicemail audio file name. Right click on the “Incoming Call” element, select Properties, the click on the “Variable” tab. Click the New button, enter email_address as the name, and initialize the value to ” in the value expression box. Repeat the same steps to add variable named vmail_folder and vmail_file.
2. Set the variable value based on the call flow. Right click on the “John” element, select Properties, the click on the “Action” tab. Click the New button, select “Set variable value”, click OK. From the Action dialog window, select email_address, enter the correct email address enclosed by single quote. For example, ‘myemail@gmail.com’. Click the New button again, select “Set variable value”, click OK. From the Action dialog window, select vmail_folder, enter the correct folder path enclosed by single quote. For example, ‘C:\\voicemails\\1001′. Repeat the same steps to define values for variable vmail_file. Set the value to be vmail_folder + ‘/’ + __VG__CURTIME_MILLIS__ + ‘.wav’. The __VG__CURTIME_LILLIS__ is a system variable representing the current time in miliseconds.
As we can see, once the call flow determines the caller is John, it sets the correct variable values for the program to use.
3. Set the correct variable values for the other accounts, such as Mary. Using the same method described above.
4. Set the voicemail file. Select “John” element, select Properties…, set the Recording File: to be vmail_file, click OK button to finish. As you can see, the variable vmail_file holds the correct folder and file name if the caller is John.
5. Repeat step 4 for other account numbers such as Mary.
6. Send voicemail to email. Right click on the “Voicemail To Email” element under “John”, select Properties, the click on the “Action” tab. Click the New button, select “Send Email”, click OK. From the Send Email Action dialog window, To use the email_address variable in the dialog, select email_address from the drop down list, then click the Insert Vaiable button > To. The voicemail attachment can be added the same way, except you choose the variable vmail_file. The finished action looks like the following:
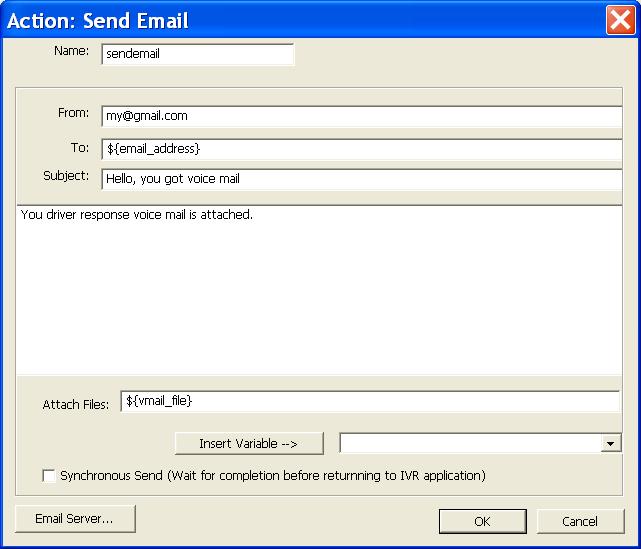
Click on the picture to see an enlarged picture. Also please replace the from email address to your email address.
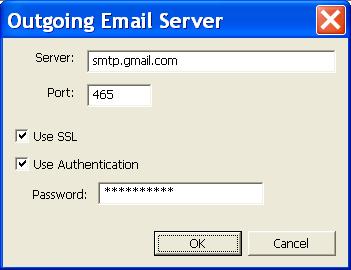
5. Click the Email Server… button from the Send Email Action dialog window. Enter your email server information. You normally can get this information from your ISP or IT department. The following is setting for gmail:
The send email action sends the account holder an email with the newly recorded voicemail as attachement.
Continue to Part III…
Share This Post: