Share This Post:
Setup Twilio Elastic Sip Trunk
Twilio provides Elastic SIP Trunk that can be used with Voicent software. This article shows how to set it up.
Step 1. Create a new Sip Trunk
Go to your Twilio console, go to the Elastic Sip Trunk dashboard. Click Create New Sip Trunk button.
Enter info as needed.
Termination Sip URI: This is the address for Voicent software to send your outbound call requests
IP Access Control: Twilio uses IP authentication for the trunk. Make sure to enter the IP address of your Voicent server.
Origination URI: this : This is the address for Twilio to send your incoming call request to Voicent software. It should be sip:IP_ADDRESS_OF_VOICENT_SERVER:5060
Please note if the server is behind a firewall/NAT, you normally need to use the outside WAN address for the IP addresses. You should work with Twilio support to get your trunk working for the server computer.
Numbers: You should normally get a phone number for your trunk.
Step 2: Configure Voicent Software to Use Twilio Sip Trunk
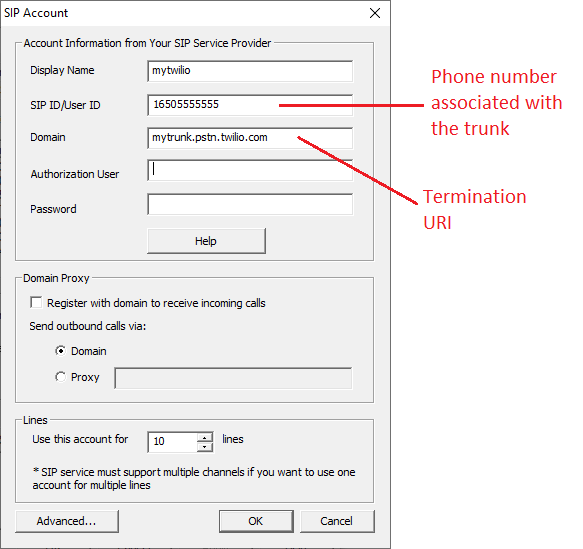
Once your Twilio Elastic Sip Trunk is setup and working, you can now configure Voicent software to use the trunk. Open Voicent App, select Setup, Options from the menu, select the SIP tab. Enter the sip trunk info as shown in the following figure:
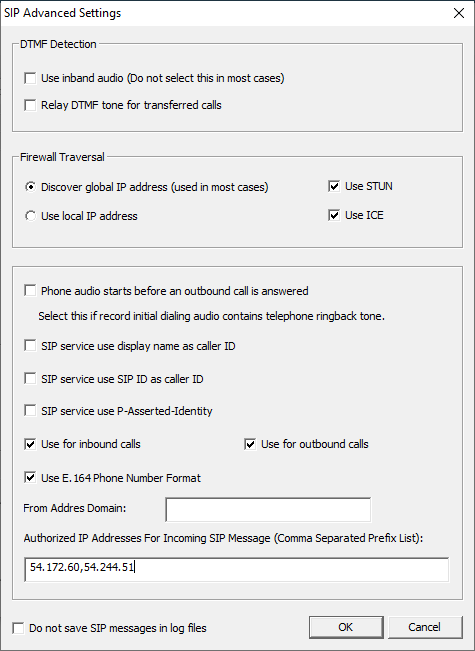
Click the Advanced Button below:
You can find the Authorized IP addresses from your twilio account, under Network info for your SIP trunk. These addresses are twilio servers that send incoming calls from. Based on your region, these addresses are different. If you leave the addresses blank, the system should still work. But it is not recommended.
It is possible to use Twilio trunk for just outbound calls or just inbound calls. The settings will be similar to the above.
Share This Post:


