I’ve purchased an OBi110 voice service bridge and telephone adapter, how do I set it up to work with Voicent software?
To setup an OBi110, you will need to follow these steps.
1. Connect the OBi110 to your network
Open up your OBi110 box and make sure you can locate an ethernet cord, a phone cord, and a power cord. Plug in the power cord, plug one end of the ethernet cord into the ethernet port on the OBi110 and plug the other end into where you access the internet, such as a router. Plug an analog phone into the “phone port” on the OBi110
 2. Create an OBiTalk Account
Go to http://www.obitalk.com/obinet/ and create an account there. You can follow these instructions: http://www.obihai.com/tutorial13
3. Add the OBi110 device to your network
After creating an account, you can click on “add device” found under your dashboard on your OBiTALK page. Once you are sure you have wired the OBi110 properly, click next. The OBi110 will automatically try to call the analog phone you have plugged in. The page will also inform you to dial a set of numbers once it reaches your analog phone, something like **5 and four additional numbers. If it is wired properly, you should be able to answer the phone and dial those numbers into the analog phone connected to your OBi110. If you were successful, the system will inform you through the phone that the OBi110 has been found and your OBITALK account will reflect the OBi110 device plugged into your network. If you are having issues with this step, make sure the OBi110 is wired correctly. You might also consider turning off your firewall or any anti-virus programs temporarily to see if they are causing interference.
4. Configure SIP information for the OBi110
Once the OBi110 has been added to your OBiTALK account Dashboard, you can click on it to edit its settings.
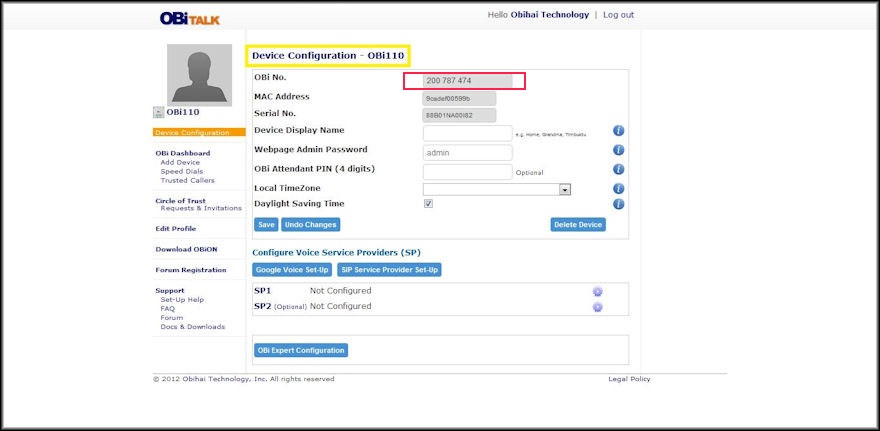
Click on the gear icon for “SP1″ to setup your SIP account information for your OBi110. Next, choose which SIP provider you plan on using:
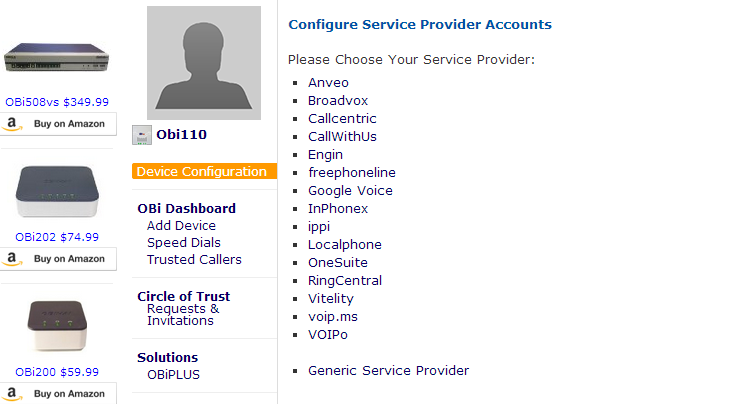
Once you have chosen your provider, the page will automatically fill in some information for you (such as domain), you will need to fill out the rest.
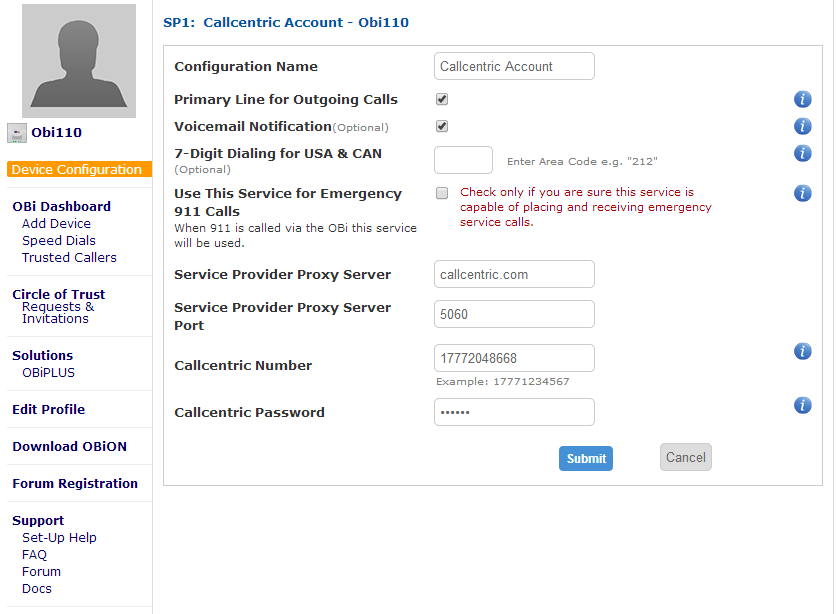 Fill in the fields with your SIP information given by the provider of your choosing. It should resemble the image above, if you use a different provider you will have a different domain, user name and password etc.
5. Make a test call
Once your OBiTalk account is able to register your SIP provider, try calling into your SIP account (that you entered in the above steps) and calling out from your analog phone. Make sure your phone is connected into the “Phone” port, your OBi110 has power along with being plugged into your router or internet connection, and also ensure you can hear a dial tone when you pick up the phone plugged into the OBi110. If you are able to connect a call to your analog phone, you are ready for the next step.
6. Edit your OBiTALK account and download the OBiON app
On your main OBiTALK page, make sure you click on “show all” to show all devices then click on “soft phone” to bring up this page:
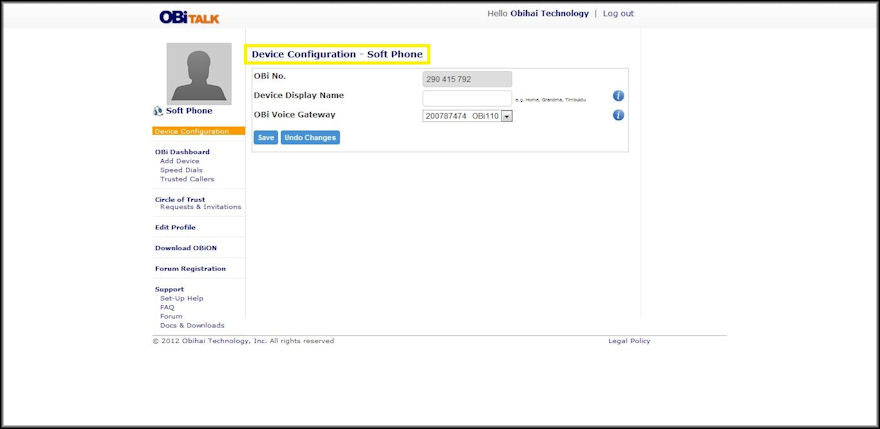
If your OBi110 device has been setup properly, as demonstrated in previous steps, you will be able to set your OBi Voice Gateway as the connected OBi110.
Ensure you specify a OBi Voice Gateway in your OBi softphone profile! This is an easy step to miss and your OBi won’t work without this step!
Next, you will want to download the OBiON app onto your computer from here: http://www.obihai.com/obiapps
OBiON is middleware that will allow you to use Voicent software with your OBi110. Once downloaded and installed, you will need to log in with your OBiTALK credentials, which should be an email address for the user name and along with your matching password.
7. Using a connected analog line
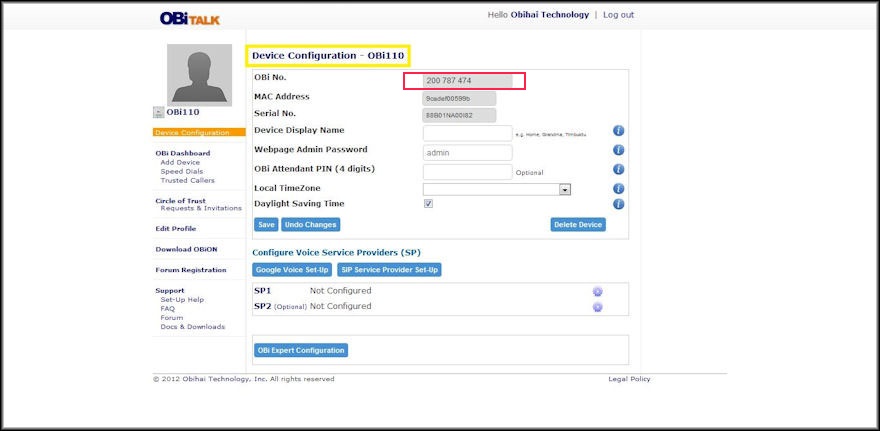
If you plan on using an analog line, first make sure one is plugged into the “line” port of your OBi110. Then you will need to access the OBi110 directly by clicking on the OBi110 in the Dashboard, then going to “Expert OBi Configuration.” Enter Expert OBi Configuration, then on the left side menu go to “Voice Service” -> “OBiTalk Service” Then in the “InboundCallRoute” field you will enter in this:
{(295495879)>(xx.):LI},{(295495879):aa},{ph}
With the 295495879 number being replaced by your OBi number, found in your OBi Dashboard. Example shown below.
8. Setup Voicent Gateway
Make sure you have successfully completed all of the previous steps. Once you have done so, you can open up Voicent Gateway, go to “Setup” > “Options” then click on the “SIP” tab.
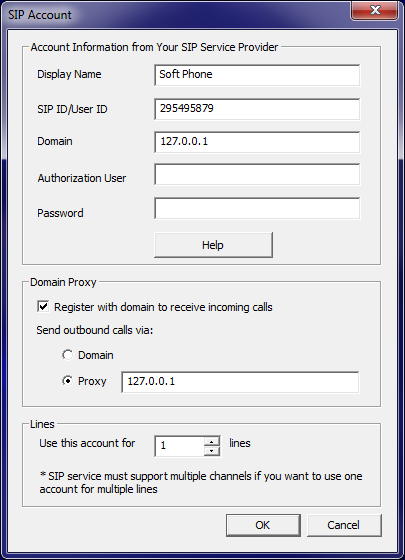 Fill in the fields as shown above, making sure your domain is 127.0.0.1, that you have checked “Register with domain to receive incoming calls”, and that you have checked “Proxy” with 127.0.0.1 filled in. The only change you need to make is that your SIP ID/User ID will be your OBi number, which can be found on your OBi Dashboard page. An example is shown below.

Once your Gateway is configured everything should be ready. You should make a test call with a Voicent program (such as BroadcastByPhone) to make sure everything is configured properly.
9. If the call doesn’t connect…
If your test call doesn’t connect you should check that you have followed all of these steps correctly, particularly that the OBi110 has power and is plugged into your router or point of access for your Internet. Also ensure that the OBiON app is running on your computer and has the correct OBi number in the status bar. One way to make sure your OBi110 is connected properly is to make another test call with an analog phone plugged into the “Phone” port. If that call can connect, then you need to check your Voicent Gateway settings. Alternatively, you can check the OBi device’s settings directly by pointing your web browser to its IP address, which you can find by accessing your own router. You may need to set the IP address to static, which can be done in the “network settings” tab of your OBi110.
10. For more information -
ObiHai main site: http://www.obihai.com/
OBi110 tutorials: http://www.obihai.com/tutorials-tips
OBiON page: http://www.obihai.com/obiapps
OBi110 Administrative Guide: http://www.obihai.com/docs/OBiDeviceAdminGuide.pdf


