Multiple user cloud account

I see that you guys offer the option to have additional users under the same account. What I’m wondering is: would each user get their own personal portal?

Each user is accessing the same portal (tools and CRM data). However, you can set up access control so each user may see different portions of the database. For example, if you set up assignment based access so a user can only see contacts that are assigned to him. You can also limit users to none manager role such that they cannot launch campaigns.

Would they also get their own personal channels for outbound calls?

Each user gets 2 outbound voice channels by default. But the channels are shared by all users in the same account. When you start a campaign, you can assign how many channels to use and which agents to work on the campaign. Though the channels are shared in an account, a manager user can easily limit the channels used by a certain user when starts a campaign.

Would I be able to distribute how many minutes are allotted to each user?

No. Minutes are shared by all users of an account. There is no quota for users.

Would I be able to set which recordings, contacts etc for outbound calls are on which users account and set it such as no other user may access them?

You can limit access to contacts per user. But recordings are shared in an account.

Posted in General, Product Usage |

Setup Twilio Elastic Sip Trunk

Twilio provides Elastic SIP Trunk that can be used with Voicent software. This article shows how to set it up.

Step 1. Create a new Sip Trunk

Go to your Twilio console, go to the Elastic Sip Trunk dashboard. Click Create New Sip Trunk button.
Enter info as needed.

Termination Sip URI: This is the address for Voicent software to send your outbound call requests
IP Access Control: Twilio uses IP authentication for the trunk. Make sure to enter the IP address of your Voicent server.

Origination URI: this : This is the address for Twilio to send your incoming call request to Voicent software. It should be sip:IP_ADDRESS_OF_VOICENT_SERVER:5060

Please note if the server is behind a firewall/NAT, you normally need to use the outside WAN address for the IP addresses. You should work with Twilio support to get your trunk working for the server computer.

Numbers: You should normally get a phone number for your trunk.

Step 2: Configure Voicent Software to Use Twilio Sip Trunk

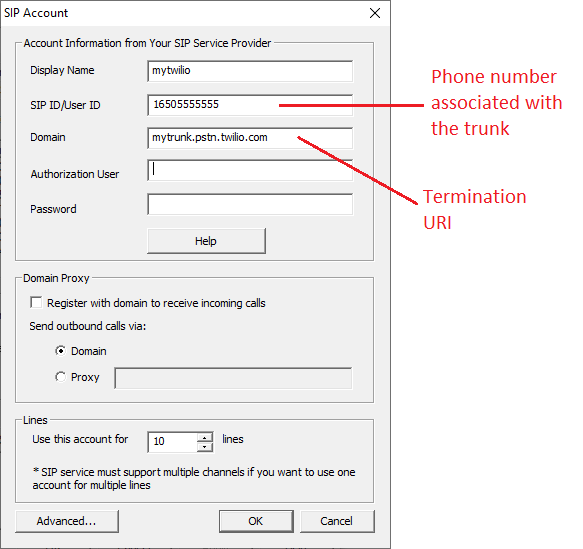
Once your Twilio Elastic Sip Trunk is setup and working, you can now configure Voicent software to use the trunk. Open Voicent App, select Setup, Options from the menu, select the SIP tab. Enter the sip trunk info as shown in the following figure:

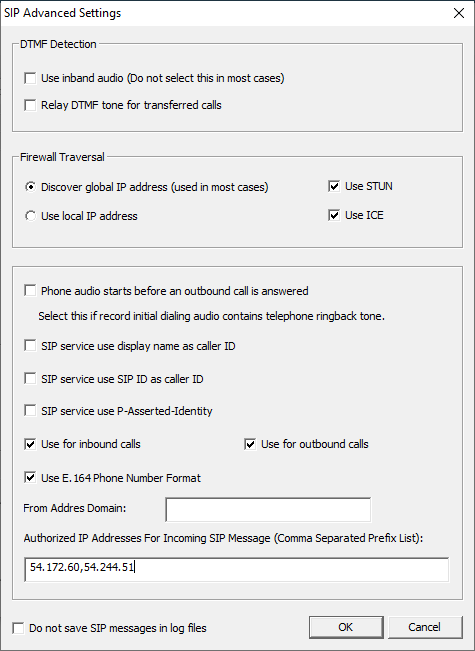
Click the Advanced Button below:

You can find the Authorized IP addresses from your twilio account, under Network info for your SIP trunk. These addresses are twilio servers that send incoming calls from. Based on your region, these addresses are different. If you leave the addresses blank, the system should still work. But it is not recommended.

It is possible to use Twilio trunk for just outbound calls or just inbound calls. The settings will be similar to the above.

Posted in General, Support |

Failed to find Java Installation

Problem: Failed to start Voicent App
Error Message: You do not have Java installed. (Free download available at http://www.java.com). Voicent Gateway cannot continue.

Reason: Some Java 1.8 versions, when installed, do not include the necessary Windows Registry values

Voicent app relies on Windows registry values to find the installed Java software. These values are set by Java installation program. When some of the values are missing, Voicent app will not be able to find Java, and thus cannot start.

Solution: Manually fix the Windows Registry

Please note this is just a workaround for now. We are planning to switch to open java in release 11.

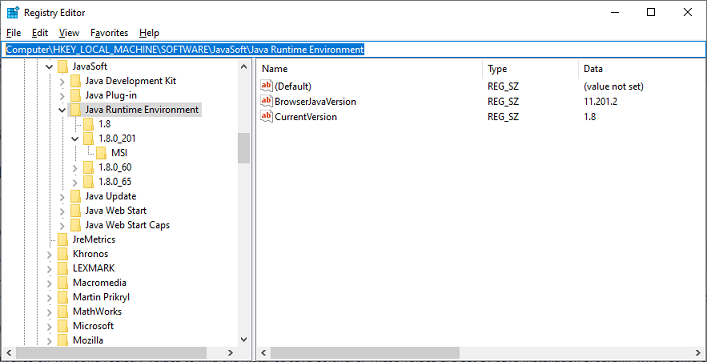
After you install Java, open Windows Registry (Windows Start, Run, regedit) and find the following key as shown below:

In this example, the installed Java version is 1.8.0_201. Your version maybe different. Now right click on the “Java Runtime Environment” node, choose “export” from the popup menu, save it.

Use notepad or other text file editor to open the file. Add WOW6432Node to the paths as shown below:


Windows Registry Editor Version 5.00

[HKEY_LOCAL_MACHINE\SOFTWARE\WOW6432Node\JavaSoft\Java Runtime Environment]
"CurrentVersion"="1.8"
"BrowserJavaVersion"="11.281.2"

[HKEY_LOCAL_MACHINE\SOFTWARE\WOW6432Node\JavaSoft\Java Runtime Environment\1.8]
"RuntimeLib"="C:\\Program Files\\Java\\jre1.8.0_281\\bin\\server\\jvm.dll"
"JavaHome"="C:\\Program Files\\Java\\jre1.8.0_281"
"MicroVersion"="0"

[HKEY_LOCAL_MACHINE\SOFTWARE\WOW6432Node\JavaSoft\Java Runtime Environment\1.8.0_281]
"JavaHome"="C:\\Program Files\\Java\\jre1.8.0_281"
"MicroVersion"="0"
"RuntimeLib"="C:\\Program Files\\Java\\jre1.8.0_281\\bin\\server\\jvm.dll"

[HKEY_LOCAL_MACHINE\SOFTWARE\WOW6432Node\JavaSoft\Java Runtime Environment\1.8.0_281\MSI]
"INSTALLDIR"="C:\\Program Files\\Java\\jre1.8.0_281\\"
"JU"=""
"OEMUPDATE"=""
"FROMVERSION"="NA"
"FROMVERSIONFULL"=""
"PRODUCTVERSION"="8.0.2810.9"
"EULA"=""
"JAVAUPDATE"="1"
"AUTOUPDATECHECK"="1"
"AUTOUPDATEDELAY"=""
"FullVersion"="1.8.0_281-b09"

Save the change. Now, from Windows Regedit, select File, Import menu, choose the just saved file. Finish the import.

Now you should inserted new values as shown below:

Posted in Installation, Support |